Poland 1 Battle of Wielun (R)
1 Battle of Wielun
(Rules: Rommel)
Battle Turn Zero and Start

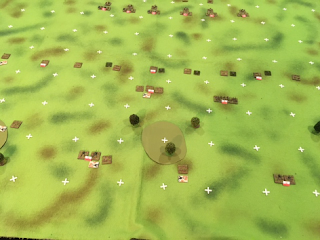
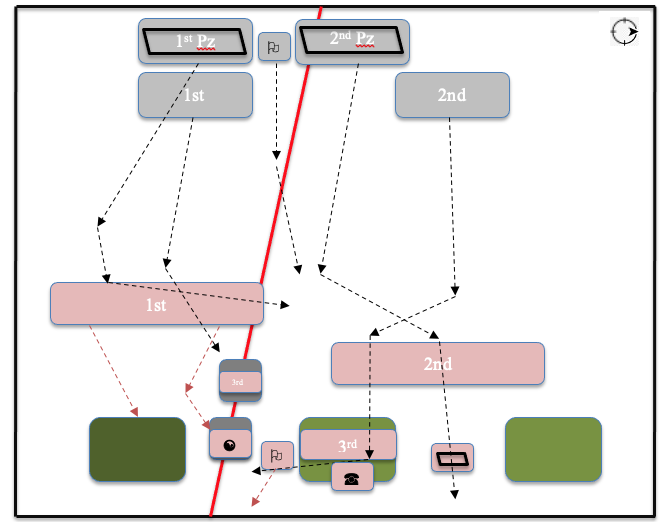
The Germans deployed with their two tank regiments at the front, backed by the motorised infantry and supporting artillery in the final line. The Poles deployed with two infantry regiments providing cordon defence with their tank companies spaced out as infantry support. Each objective marker had a defending company and the remaining infantry were placed in reserve behind the centre with the cavalry battalion, acting as a mobile reserve. The artillery was placed in two locations.
The objectives comprised a GHQ Command Centre, a Supply Depot, two undefined objectives and three dummy markers.
Battle Turn One
The Germans started by focussing their attack on their right, aiming to cover both defences with tank and non-tank defenders. Under these rules the lack of armoured defence reduces the damage the defenders do to attackers rather than increasing the defenders losses. Nevertheless, the attackers tore a hole in the defensive line, while the attack in the centre failed to achieve success; an armoured counter-attack in the centre by the Poles did nothing to compensate for the Germans success.
The Poles now had the opportunity of choosing the DEFENCES event and putting down defensive fortifications.

Battle Turn 2
The Germans expanded the gap by eliminating the Polish troops on their far-right flank and bringing forward the troops from the rear. The Polish troops from the reserves had fanned out to their left flank to restore a battleline for which the cavalry was particularly useful due to their faster speed.

Battle Turn 3
The Germans continued to exploit their success on the right by taking the next line of defences while the Poles continued to spread their unit along their front. One of the limitations of the rules is the ability of units to step themselves by side shuffling, enabling defenders to bunch defending units where required and thus the Poles continued to shift units to the threatened area. This did not stop the Germans making progress.

Battle Turn 4
The Germans continued to press the attack, eliminating the next line of defences, exposing the Polish artillery to attack.

Battle Turn 5
The German attack continued into the gunline and the fortified position of guns, headquarters and defence company were taken by the attackers who thus had cleared everything south of the central woods.

Battle Turn 6
A concentric attack was now possible on the Polish centre but it proved to be a tough nut to crack. The Poles then started creating a fall-back line with their remaining units.

Battle Turn 7
The Germans now extended the attack to the left flank, overrunning the Polish position and taking a further objective. They now felt they lacked sufficient strength and time to make further progress.

The Germans had overrun two dummy markers but had succeeded in taking the two general objectives and the GHQ; additionally, a LoC across the battlefield had been opened up. This was a total of 4VPs.
Lessons
Different rules give different approaches depending on the design approach taken in the rules!


Comments